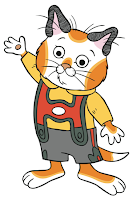
A friend threw a party for her son who turned 4. His favorite books are the Richard Scarry books. So that was the theme of the party. I was asked to do a cake with some kind of Richard Scarry theme. If you don't know about Richard Scarry, then start with his Wikipedia article.
After much web searching and with lots of help from my wife, we decided to do a simple Huckle Cat cake. Here is a picture of Huckle Cat:
To start with, we baked two 12x18 sheet cakes. The flavor chosen by the birthday boy was strawberry. I thought a vanilla buttercream would make a nice compliment for the filling. After leveling and stacking the layers, it was time to carve out the shape. While a 3D carving would have been cool, it would not have left enough cake for the party. So we left it as a 2D carving.
To work out the shape, we took a sheet of parchment paper and drew out a picture of Huckle. This is handy because we can see it actual size and work out any problems with symmetry and scale before actually cutting any cake. After the drawing was made, we just cut the shape out, laid the parchment on the cake and then cut along the outline.
After a quick crumb coat, the cake looked like this:
After this, we covered Huckle with pieces of differently colored fondant. I like Satin Ice brand fondant because they have some nice pre-colored fondant. The red and blue are pre-colored. For the yellow, I had to color it myself with some Wilton yellow color paste. I think it came out okay.Getting all the cuts and layers was probably the most difficult part of the cake. To get the insides of the pant legs, I had to put some strips of red fondant in place and then have the main pant section overlay the smaller strips to help hide that it's not one big piece. Otherwise, the angle is too tight and I'm not that skilled with fondant.
The black paint is just black food color powdered mixed with tiny amounts of lemon extract to make a paint. To finish it off and give it a clean look, we made some cuffs for the sleeves and pant legs.
Finally, Goldbug had to make an appearance. If you don't know Goldbug, I suggest reading "Cars, Trucks, and Things That Go". :-)


This is too darn cute!!! I think this is one of your best creations yet!!! Great Job!!!
ReplyDeletehow did you make this http://www.tracyprobst.com/cake/Truck/ so that you can see all the cake can i buy a software to do that
ReplyDeleteJoy, that spin around view for the truck cake is custom software that I wrote. It was a series of 36 images taken at 10-degree increments on a turntable and then animated together with some Javascript.
ReplyDeleteso do you sell this software or is it something that i will have to make myself or get a geek to do?
ReplyDeleteJoy, I don't sell the software. It's just a bit of custom javaScript. If you have a web geek friend, he or she is free to copy the code and use or modify it. Just give me credit in the script source code.
ReplyDelete